I got some new parts in that let me expand the Arduino in different ways, as well as a couple extra Atmegas, as I killed one of mine messing with its fuses.
- Parts I received:
- 2 - TLC5940NT - 16 PWM Output
- 2 - PCF8574N - 8 Digital I/O
- 2 - ATMEGA328P-PU - Microcontroller (Arduino Brain)
First I hooked up the TLC, and loaded this library into the Arduino IDE. Loading up the basic use sketch, I made sure everything was working right.
After that, I hooked up the PCF, and followed some of this tutorial to get it working.
After that, I hooked up the PCF, and followed some of this tutorial to get it working.
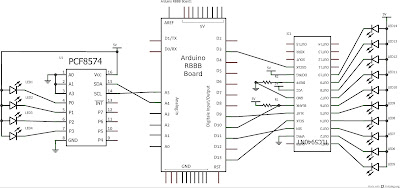
This is the setup I ended up with:
*Note, I should have added a resistor to each of the LED's hooked up to the PCF, 330 ohm should be fine.
My next step was to write some code to show off the functions of these chips. So i decided to have the TLC do a Knight Rider effect, and the PCF just do some patterns.
Here is the result:
One of the huge advantages of the TLC is that it has twice the resolution of the internal PWM's, and doesn't need a resistor on each LED, just the one reference resistor. You can also daisy chain multiple TLCs together without using more pins on the Arduino, allowing for up to 4096 PWM channels.
The PCF is nice as you can hook them together in parallel on the same two wires. It can also read the pins, not just do output.
The one interesting thing about both of these chips, is you use them as current sinks. This means you hook the LED anode to VCC, and the cathode to the chip. You set the pin to HIGH to turn the LED off, and to LOW to turn the LED on.
With this, I can now build more projects, without worrying about running out of pins.
Here is my code and the library for the TLC:


nice. What do you plan on putting it in?
ReplyDelete